How to enable Omi NTFS Disk from Mac App Store?
You might need a helper to enable the NTFS write permission if you download the Omi NTFS Disk on Mac App Store.
Why do I need a Helper?
Due to the sandbox limitations on Mac App Store, you must install a helper to enable the NTFS write permission. It is straightforward.
* Important *
If your system has been upgraded to macOS Ventura 13.0, please upgrade the Omi NTFS disk downloaded in the Store to the latest version (above 1.1.0), then reinstall the helper.
How to install Helper?
Download the Omi NTFS Disk Helper. After downloading the file, double-click to install it. Select "Install Helper" in the open interface and follow the prompts.
How should I do the configuration after installing the helper?
After the plug-in is installed successfully, you must enable system extensions and allow permission to load the omi NTFS kernel on macOS Ventura 13.0 and above. There are many steps to be performed on Mac computers with Apple chips (M1/M2) but overall is not complicated. Patiently follow the step-by-step instructions below.
The system version is below the macOS Ventura 13.0
After the installation is complete, restart the system.
The system version is macOS Ventura 13.0 and above
Since macOS Ventura 13.0 removes the NTFS-related kernel, enabling the omi NTFS kernel extension to mount an NTFS disk in read-write mode is necessary.
The following steps are for the Mac with Intel chips (not Apple chips M1/M2)
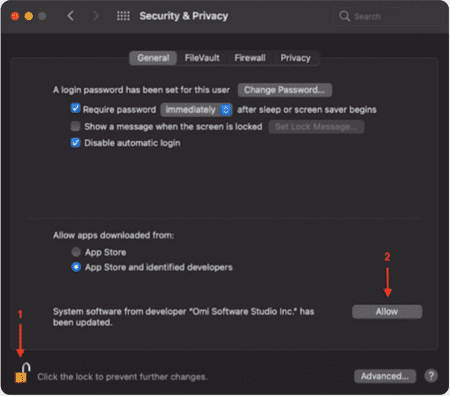
1. After the helper is installed, Open System settings, select Privacy & Security on the left, and scroll to find the security options shown in the figure below. If you can't find it, restart the computer and see if there are any security options, as shown in the figure below. If it still doesn't, just skip the following steps and open the APP to mount the disk.
2. Click Allow, enter the password and restart the computer.
The following steps are for the Mac with Apple chips (M1/M2)
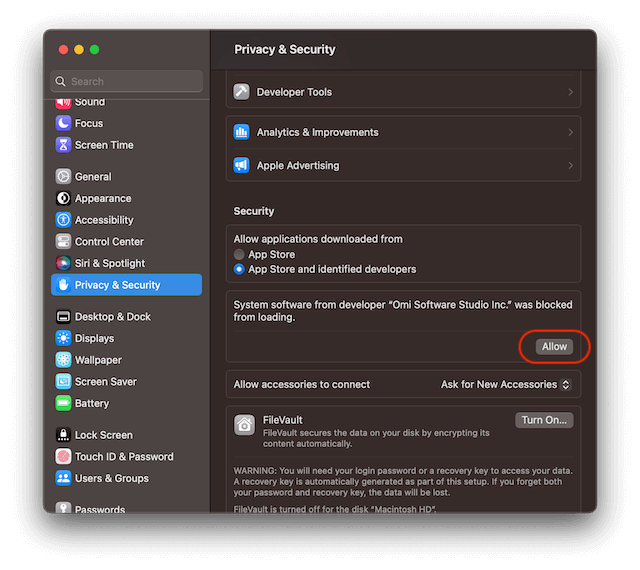
1. After the helper is installed, Open System settings, select Privacy & Security on the left, and scroll to find the security options shown in the figure below.
2. If the Allow button shows as the figure below, click Allow, enter the password and restart the computer. Skip all steps below and open the APP to mount the disk.
3. If no button shows, restart the computer and see if any button is shown in the security options. If it still doesn't, just skip the following steps and open the APP to mount the disk.
4. If the Enable System Extensions button shows as the figure below, do the next step.
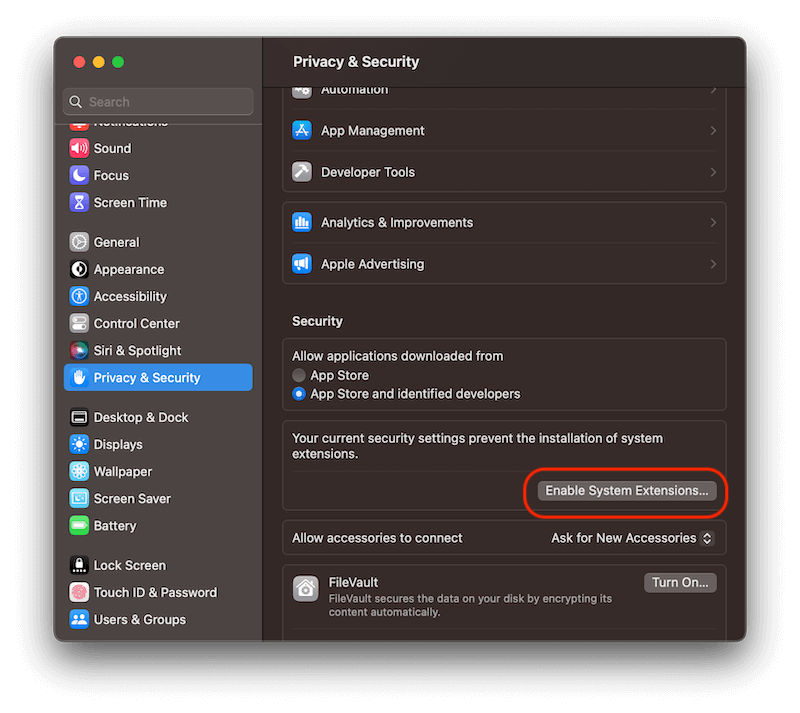
5. Click Enable System Extensions and the following interface pops up. Click Shutdown directly.
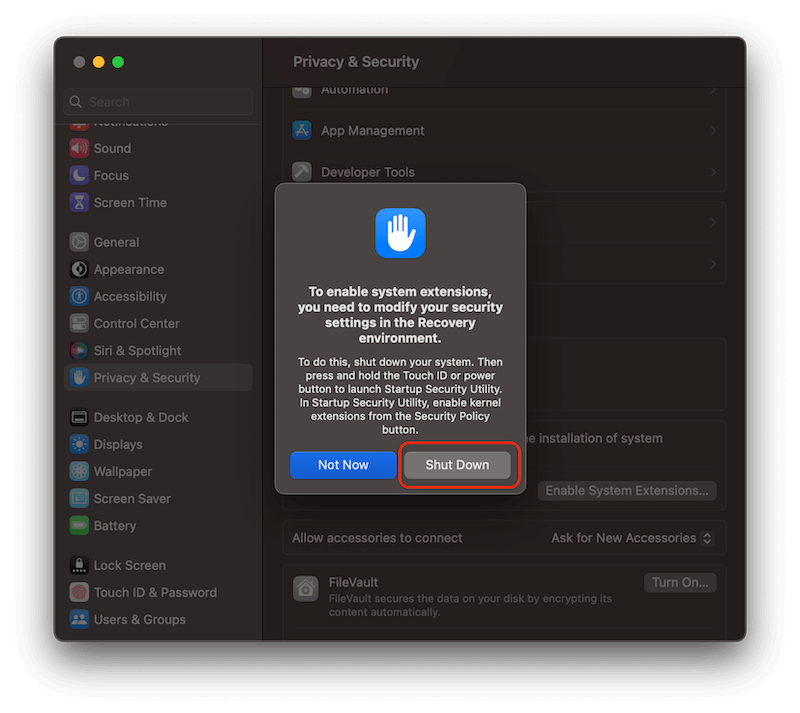
6. After the shutdown is successful and waiting for 10 seconds, press and hold the power button until the text "Loading startup options" appears and release the power button to enter the system recovery mode.
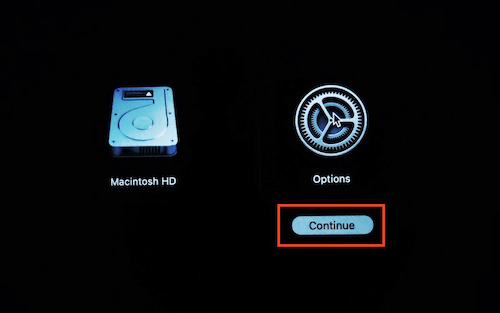
7. Select the "Options" icon and click "Continue"
8. Select the administrator user and enter the password to log in.
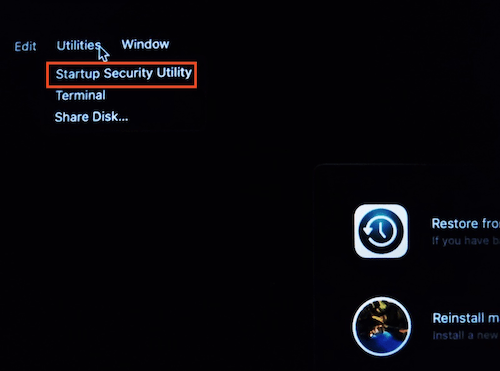
9. Click "Utilities" in the top toolbar and select "Startup Security Utility"
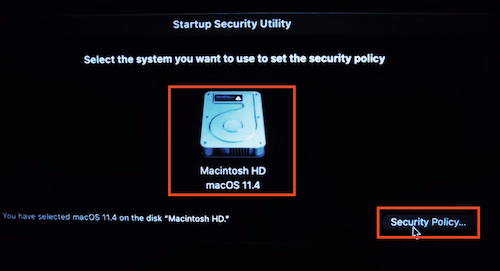
10. Select the system disk, then click "Security Policy" in the lower right corner.
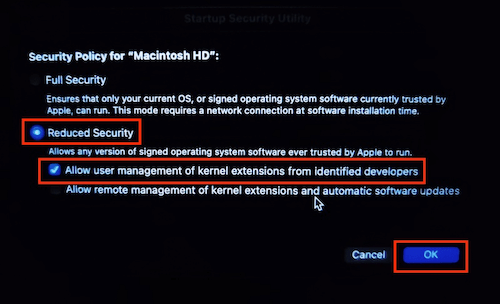
11. Check "Reduce Security" and "Allow user management of kernel extensions from identified developers" then click "OK" in the lower right corner to confirm.
12. Click on the Apple logo in the upper left corner to reboot the system.
13. After rebooting, Open System settings, select Privacy & Security on the left, and scroll to find the security options shown in the figure below.
14. Click Allow, enter the password and restart the computer.
Mounting the NTFS disk, repairing the disk, and formatting the disk keep failing. What should I do?
1. If you have installed Omi NTFS Disk Pro from the website, open it and right-click on the status icon. Click Uninstall the app and reboot the system. Open the Omi NTFS Disk from the App Store after rebooting, and try to mount/fix the disk again.
2. If you have installed other NTFS disk Apps and haven't uninstalled their kernel extensions, it may cause conflicts and cause the mount to fail. Open Finder, shortcut key cmd + shift + g, enter /Library/Extensions/ and /Library/Filesystems/ directories. If there are the following files, delete and restart the system, and then try to mount the disk with Omi NTFS Disk.
/Library/Filesystems/iboysoft_NTFS.fs
/Library/Filesystems/ufsd_NTFS.fs
/Library/Filesystems/tuxera_ntfs.fs
/Library/Filesystems/macfuse.fs
/Library/Extensions/ufsd_NTFS.kext
/Library/Extensions/ms_ntfs.kext
3. Open System Settings, find Privacy & Security - Privacy - Full Disk Access, check the list and authorize all the items listed below. If items are not found, skip to the next step.
com.omi.ntfs.HelperTool
omnintfsfix
omni_ntfs-formatter
xNTFS Helper Installer
4. Open System Settings, find Privacy & Security
If the system version is below macOS Ventura 13.0, check if there is any prompt message similar to the figure below. If there is, click the button according to the prompt, and restart the system.
If the system version is macOS Ventura 13.0 and above, check if there is any prompt message similar to the figure below. If there is, click the button according to the prompt, and restart the system.
5. If you still cannot mount the NTFS disk after performing the above steps or can only mount in read-only mode, try to reinstall Omi NTFS Disk Helper.
What is the difference? I found the Omi NTFS Disk on App Store & Omi NTFS Disk Pro on your website.
Which one should I try for my NTFS Disk? Both are ok. Omi NTFS Disk on App Store can be installed easily, but there are some limitations, like you can only open the disk in the Omi app, not in Finder. Omi NTFS Disk Pro on the Website can do more, but the installation process is complex, especially when using M1.
If you want to try the one on App Store, search Omi NTFS or download it from App Store.
If you want to try the pro version on the website, here is the Introduction to How to install Omi NTFS Disk Pro.
If you still have questions about your NTFS Disk, read this 100% make your NTFS Disk/SD card read and write on Mac.