All-In-One video library & player for iOS/macOS/tvOS
...
Best local and net disk movie/tv player on Mac, creating a local personal media library.
Price reduced to Free Trial!
  • $29.99
  • 0
How to record Zoom meeting with sound without host permission on Mac
  • MacTech
  • 2026-02-13 11:49:48


How to record a Zoom meeting with sound without host permission on Mac

Use the built-in Zoom recorder to record it.

​ 1. During the meeting, if you are the hoster or the hoster allowed to record the meeting, you can click the record button in the meeting window to do a recording.

​ 2. All the meeting participants will see the recording badge when you start recording. You can pause or stop it at any time during the recording.

The following is the main limitations of recording zoom meeting using the zoom build-in recorder

1. The meeting host or the Zoom administrator's permission is required for the recording.

2. All the participants of the meeting will see the recording reminder. You can not record the meeting in private.

Use Omi Screen Recorder to record Zoom meetings with sound without host permission on Mac.

After trying many screen recording Apps on Mac, I finally found A free screen recording App that supports recording Zoom meetings with sound on the Mac App Store - Omi Screen Recorder.

The First use of the Omi Screen Recorder

After installing the omi screen recorder, an authorization window will pop up the first time you open the APP, requesting permission to record the screen, microphone, and camera. When recording a zoom meeting, you must want to record the screen, the microphone, or the system sound. It is recommended to allow all of these permissions here.

Start recording and enable recording system sound and microphone sound.

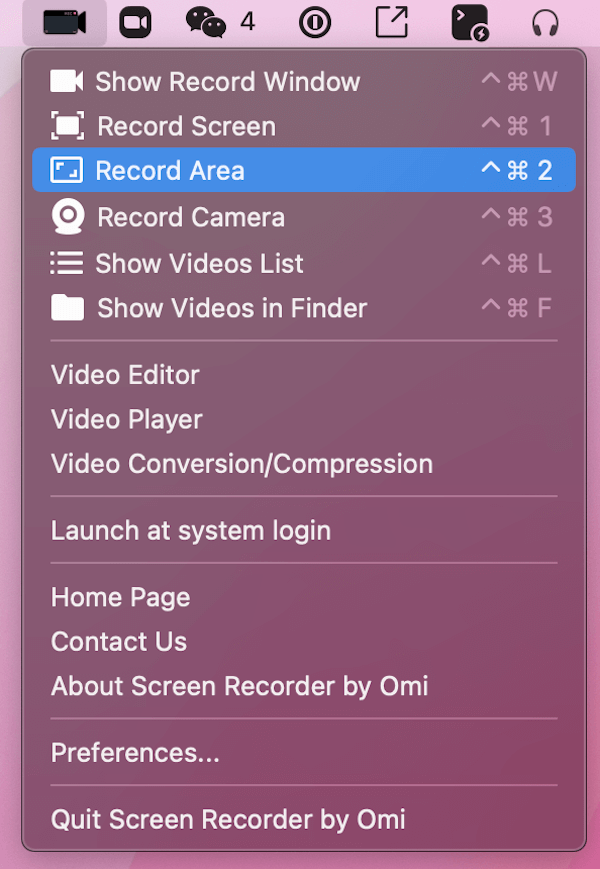
​ 1. After launching the App, click on the Omi Screen Recorder icon on the status bar to show the main menu. Choose Record Screen (default global shortcut key: Ctrl + ⌘ + 1) or Record Area (default global shortcut key: Ctrl + ⌘ + 2).

Screen Recorder by Omi-Main Menu

​ 2. It shows the recording options panel at the bottom of the screen. Check the System Audio checkbox, and a system alert will pop up to let you download the Omi Screen Recorder Audio Driver PKG Installer. Double-click to install it after downloading.

Screen Recorder by Omi - Screen Recording Options

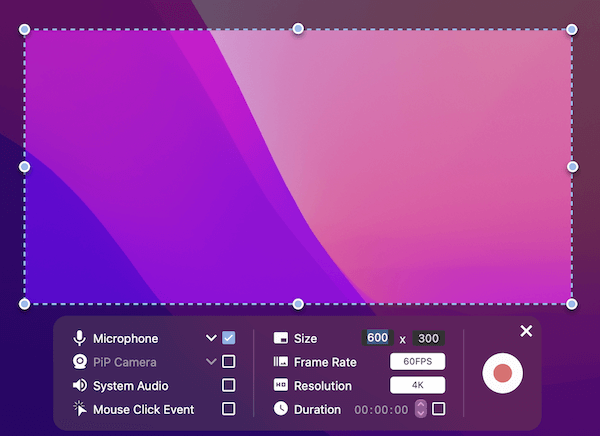
​ 3. After installation, do the operations in steps one and two again. Check the System Audio checkbox and the Microphone checkbox if you want to record the microphone sound simultaneously. If you are using an external microphone device, click the drop-down icon beside the Microphone checkbox(the system's built-in microphone will be selected by default).

​ 4. Click the red circle button on the recording options panel to start recording directly (default shortcut key Ctrl + ⌘ + R). The system sound will come out from your headphones or speaker simultaneously when recording with it.

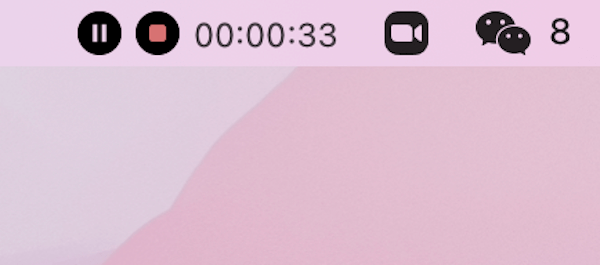
​ 5. Click the end button on the status bar to finish recording and save the recorded video. Open the recorded video to check if it includes the system sound and the microphone sound.

Screen Recorder by Omi - Recording Status

Start recording Zoom meetings with sound using Omi Screen Recorder.

​ 1. Open Zoom, click the avatar on the top-right corner, then click the settings in the pop-up menu.

​ 2. Click the audio tab in the settings window, open the Speaker list on the right side

If the Zoom version is higher than 5.8, and you see the Speaker Setting with "Same as System", you do not need to change anything. Just keep the "Same as System".

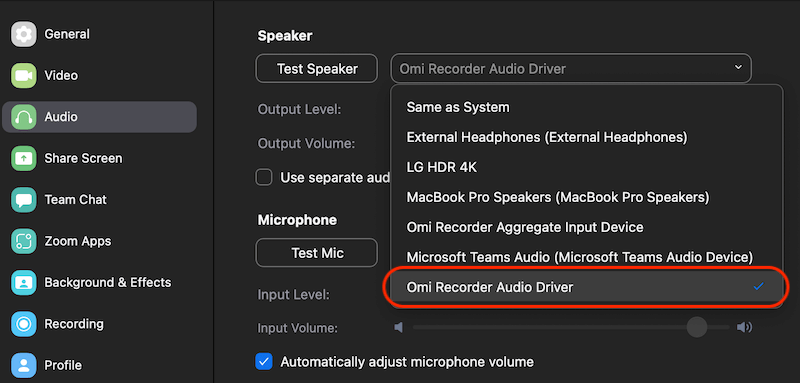
If the Zoom version is lower than 5.8, and you did not see the speaker default option "Same as system", the default one is "System Default" you need to change it to "Omi Recorder Audio Driver".

​ 3. Record the Zoom area with system sound, and microphone enabled using Omi Screen Recorder.

If you are not using Zoom but still want to record a screen with audio, here is the "How to record screen on macOS with audio?"

More Omi Screen Recorder Tutrial, Please check the How to record screen and camera on Mac with Omi Screen Recorder.


Hottest Articles

Latest Articles

Mac System Data Exceeding 200GB? Here’s How to Actually Clear It — A Deep Dive with Heavy Keynote Usage and Time Machine as Examples I. Problem Overview After long-term use, some macOS users discover that “System Data” in Storage Settings grows abnormally large. Common symptoms include: System Data occupying 200GB or more https://cdn.okaapps.com/resource/图2.webp No corresponding files can be located in Finder Deleting caches or log files has little effect Third-party cleaning tools are ineffective Uninstalling and reinstalling apps (such as Keynote) does not help Even after reinstalling macOS, the issue reappears after some time This problem is especially common among heavy productivity users, such as those working extensively with Keynote, Final Cut Pro, or design tools. II. Commonly Tried but Ineffective Solutions Users typically attempt the following methods, most of which fail to solve the problem at its root: Manually deleting directories such as ~/Library/Caches and ~/Library/Logs Using third-party cleaning tools like CleanMyMac or similar utilities Uninstalling and reinstalling Keynote Reinstalling macOS via “Reinstall macOS” These approaches are limited because they do not address the real sources behind System Data inflation. III. What Exactly Is “System Data”? It is important to understand that: System Data is not a real folder, but rather a collection of data that macOS cannot accurately categorize. System Data may include, but is not limited to: macOS system temporary files Application and system caches Portions of the user Library (~/Library) Files Spotlight cannot classify Large resource files inside application packages Local caches from cloud services (such as iCloud or OneDrive) iPhone / iPad backup files Residual data from deleted user accounts Time Machine local snapshots As a result, System Data cannot be reliably inspected or reduced through simple cache deletion or Finder-based browsing. IV. Key Cause #1: Time Machine Local Snapshots Consuming Disk Space How Local Snapshots Work Even when no external drive or NAS is connected, macOS will: https://cdn.okaapps.com/resource/图3.webp Create a Time Machine local snapshot every hour Retain snapshots from the last 24 hours by default If the backup destination remains disconnected, keep local snapshots associated with the most recent full backup These snapshots: Are based on the APFS file system Do not appear as regular files Are entirely counted under System Data In some cases, local snapshots can consume tens or even hundreds of gigabytes. https://cdn.okaapps.com/resource/图4.webp Why They Sometimes Cannot Be Deleted When Time Machine uses a NAS or network storage device as its backup destination, the following situations may occur: The NAS was previously disconnected The network path or IP address changed The backup was not re-“claimed” by the system As a result, macOS may treat these snapshots as belonging to an unreachable backup destination, leading to: tmutil deletion failures Errors such as Stale NFS file handle Snapshots that cannot be reclaimed, causing persistent disk usage V. Key Cause #2: How Keynote and Similar Apps Amplify System Data Keynote itself is not malfunctioning, but its design inherently amplifies System Data usage: Keynote files are actually packages containing large numbers of resources These may include: High-resolution images Embedded videos Fonts Animation and transition assets Spotlight sometimes fails to correctly classify these resources, causing them to be grouped under System Data. For users who frequently create large, media-heavy presentations, steady growth in System Data over time is expected. VI. Effective Solutions (Prioritized) Solution 1: Verify and Restore Time Machine Backup Status (Recommended) Open Disk Utility From the menu bar, select Show APFS Snapshots Select the system Data volume Check whether a large number of Time Machine local snapshots exist If using a NAS as the backup destination: Reconnect the NAS Select the original backup in Time Machine settings Follow the prompts to claim the existing backup Once the backup relationship is properly restored, macOS can automatically manage and reclaim snapshot space. Solution 2: Use Disk Analysis Tools to Identify Real Space Usage It is recommended to use tools that analyze disk usage without automatically deleting files, such as: GrandPerspective EtreCheck The goal is to identify: Which files or directories consume the most space Whether disk usage is abnormally concentrated in specific areas Avoid relying on “one-click cleanup” tools. Solution 3: Check for Residual Data from Old User Accounts If the device previously: Had multiple user accounts Removed accounts without deleting their home folders Then old home directories may still exist and be counted as System Data. Solution 4: Rebuild the System Environment Completely (Last Resort) When System Data usage becomes severely unmanageable and no clear source can be identified, the only definitive solution is: Fully back up all current data Erase the disk and reinstall macOS During setup: Migrate only the user account Do not migrate system settings, applications, or Library data This approach completely removes legacy data structure issues. VII. Long-Term Prevention Tips (for Keynote and Content Creators) Archive older Keynote projects to an external drive or NAS Avoid storing large volumes of presentation files locally for long periods Keep the Time Machine backup destination consistently available Avoid third-party tools that perform automated “system-level cleaning” Periodically monitor disk usage with analysis tools VIII. Conclusion Abnormally large macOS System Data usage is rarely caused by a single cache or log issue. Instead, it is typically the result of Time Machine local snapshots, application package resources, and inherited historical data structures working together. Only by understanding what System Data actually contains—and addressing the root causes—can disk space issues be resolved effectively and long-term.