All-In-One video library & player for iOS/macOS/tvOS
...
Best local and net disk movie/tv player on Mac, creating a local personal media library.
Price reduced to Free Trial!
  • $29.99
  • 0
How to enable the NTFS write on Mac Ventura?
  • Oka Assist
  • 2026-02-13 10:12:52


How to enable the NTFS to write on Mac Monterey?

If you upgrade to Monterey, you might have questions similar to the following:

How to fix the NTFS external drive read-only on macOS Monterey?

How can the NTFS read/write function be enabled on macOS Big Sur or Monterey?

How to enable NTFS to write support on M1/M1 Max/M1 Pro Mac?

How do I make my Mac NTFS writable?

Can macOS Monterey write to the NTFS disk?

How can I activate NTFS for free on Mac?

How do I change my Mac to NTFS?

The new macOS 12.0.1 Monterey has been released. There are a lot of new features in this new version. But as usual, it does not support NTFS disk. NTFS has been used in windows by Micros Soft since 1993. And NTFS is not an open-source file format, so Apple is tired of supporting this file system by guessing the interface; after macOS 10.13, Apple did not support NTFS by default.

How to write to the NTFS disk drive on macOS Monterey?

Third-party NTFS drives

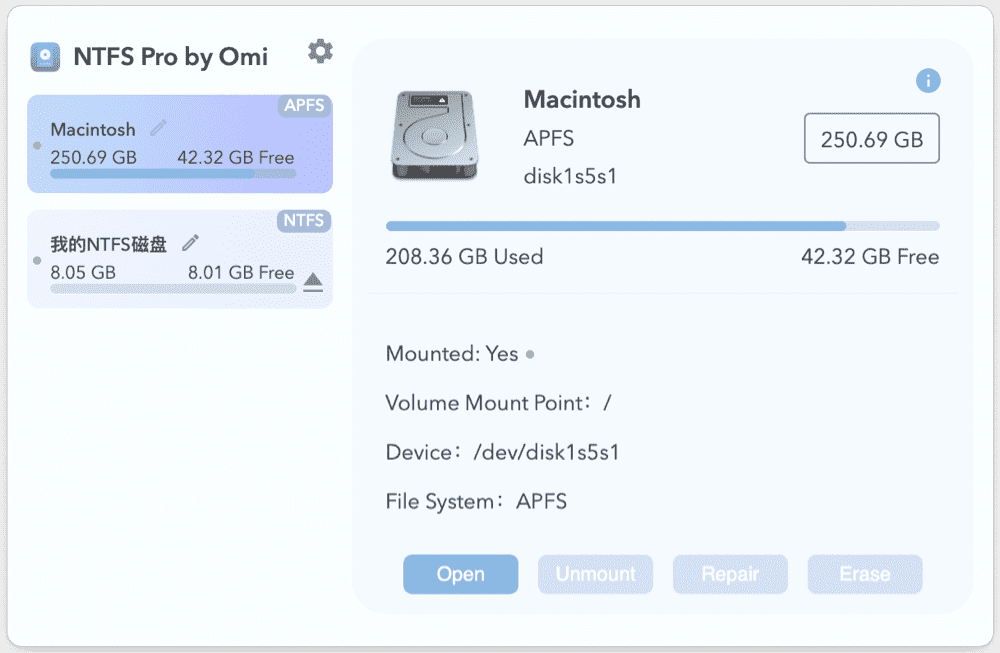
  1. Omi NTFS Disk Pro, Free. This is the reason you should try first. Best Free Windows NTFS Disk Management App for macOS. It supports Apple Silicon M1, M1 Pro, M1 Max, and M2 chips. Also, it has supported macOS since 10.13. It can mount/unmount NTFS drive, read/write/copy/paste/edit files in NTFS disk. Unlike all the other NTFS apps, it is free and provides additional features. You can even repair and format the disk in the app.

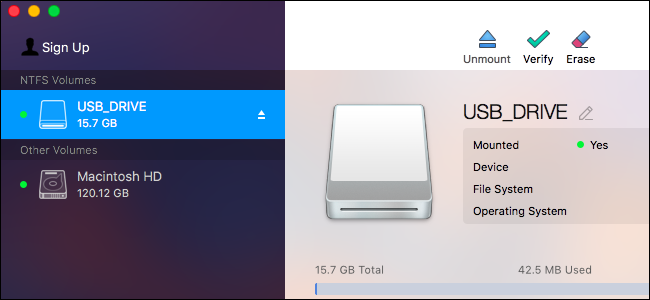
  2. NTFS for Mac by Paragon Software is another excellent app for NTFS drive, but the price is very high; I would not suggest you buy directly; maybe have a trial first. And remember, only one NTFS app can be used on your Mac, so please try first.

  3. Tuxera NTFS for Mac is the one that is even more expensive than Paragon; the feature is very similar. So I would not suggest you try this one.

    And there are a lot of 3rd party NTFS apps, but most of them are paid apps. The reason is nobody has the document or NTFS interface from Micro-Soft; developers need to put a lot of effort into debugging and find a way to support this on macOS.

Using the command line to enable writing to NTFS drives (Does not work on macOS 13.0 Ventura)

Yes, you can enable this with some simple command lines in Terminal. But it is very complex; I will list the steps below. Before you try, an alternative way to have this is by installing Omi NTFS Disk on Mac Store. Omi NTFS Disk on Mac Store is the same as the below command line, but you need to install the app; it will do everything for you.

What is the difference between the store version Omi NTFS Disk and Omi NTFS Disk Pro installed on the website?

I would suggest the Pro version; since the Store version, you can not open the disk in the finder; you need to open it in the Omi NTFS App.

The command line is the same as the Omi NTFS Disk, but you can try a DIY with the command line if you are a geek.

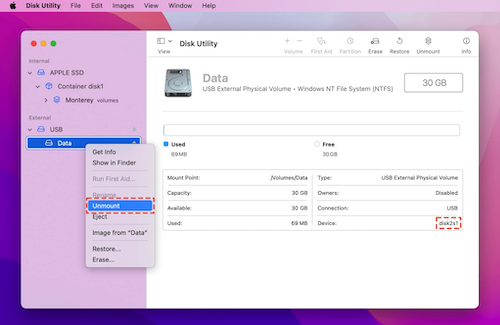
  1. Open Disk Utility in your Application -> Utilities Folder

  2. Right Click on your USB Drive and select "Unmount"

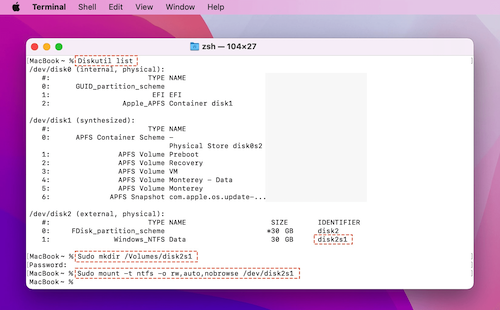
  3. Open Terminal in your Application -> Utilities Folder

    In this Terminal Console, input the below commands (Remember to replace the "disk2s1" section with the identifier of your NTFS drive):

    diskutil list

    sudo mkdir /Volumes/disk2s1

    sudo mount -t ntfs -o rw,auto,nobrowse /dev/disk2s1 /Volumes/disk2s1

    After this command, you might need to input your mac login password or admin password. And after that, you still can not find your disk in your finder. But you can use the Finder -> Go -> Go to Folder, and type "/Volumes" in the search box, then you will find your disk.

Format your NTFS drive to exFAT or APFS

exFAT is supported by Windows & macOS, so this is the option you can choose, backup your files on an NTFS drive and format them to exFAT format. Erase the drive with Disk Utility. There will be an option for the disk format. Choose ExFAT.

If you are using the disk for macOS, choose the APFS, which is apple's file system.


Hottest Articles

Latest Articles

Mac System Data Exceeding 200GB? Here’s How to Actually Clear It — A Deep Dive with Heavy Keynote Usage and Time Machine as Examples I. Problem Overview After long-term use, some macOS users discover that “System Data” in Storage Settings grows abnormally large. Common symptoms include: System Data occupying 200GB or more https://cdn.okaapps.com/resource/图2.webp No corresponding files can be located in Finder Deleting caches or log files has little effect Third-party cleaning tools are ineffective Uninstalling and reinstalling apps (such as Keynote) does not help Even after reinstalling macOS, the issue reappears after some time This problem is especially common among heavy productivity users, such as those working extensively with Keynote, Final Cut Pro, or design tools. II. Commonly Tried but Ineffective Solutions Users typically attempt the following methods, most of which fail to solve the problem at its root: Manually deleting directories such as ~/Library/Caches and ~/Library/Logs Using third-party cleaning tools like CleanMyMac or similar utilities Uninstalling and reinstalling Keynote Reinstalling macOS via “Reinstall macOS” These approaches are limited because they do not address the real sources behind System Data inflation. III. What Exactly Is “System Data”? It is important to understand that: System Data is not a real folder, but rather a collection of data that macOS cannot accurately categorize. System Data may include, but is not limited to: macOS system temporary files Application and system caches Portions of the user Library (~/Library) Files Spotlight cannot classify Large resource files inside application packages Local caches from cloud services (such as iCloud or OneDrive) iPhone / iPad backup files Residual data from deleted user accounts Time Machine local snapshots As a result, System Data cannot be reliably inspected or reduced through simple cache deletion or Finder-based browsing. IV. Key Cause #1: Time Machine Local Snapshots Consuming Disk Space How Local Snapshots Work Even when no external drive or NAS is connected, macOS will: https://cdn.okaapps.com/resource/图3.webp Create a Time Machine local snapshot every hour Retain snapshots from the last 24 hours by default If the backup destination remains disconnected, keep local snapshots associated with the most recent full backup These snapshots: Are based on the APFS file system Do not appear as regular files Are entirely counted under System Data In some cases, local snapshots can consume tens or even hundreds of gigabytes. https://cdn.okaapps.com/resource/图4.webp Why They Sometimes Cannot Be Deleted When Time Machine uses a NAS or network storage device as its backup destination, the following situations may occur: The NAS was previously disconnected The network path or IP address changed The backup was not re-“claimed” by the system As a result, macOS may treat these snapshots as belonging to an unreachable backup destination, leading to: tmutil deletion failures Errors such as Stale NFS file handle Snapshots that cannot be reclaimed, causing persistent disk usage V. Key Cause #2: How Keynote and Similar Apps Amplify System Data Keynote itself is not malfunctioning, but its design inherently amplifies System Data usage: Keynote files are actually packages containing large numbers of resources These may include: High-resolution images Embedded videos Fonts Animation and transition assets Spotlight sometimes fails to correctly classify these resources, causing them to be grouped under System Data. For users who frequently create large, media-heavy presentations, steady growth in System Data over time is expected. VI. Effective Solutions (Prioritized) Solution 1: Verify and Restore Time Machine Backup Status (Recommended) Open Disk Utility From the menu bar, select Show APFS Snapshots Select the system Data volume Check whether a large number of Time Machine local snapshots exist If using a NAS as the backup destination: Reconnect the NAS Select the original backup in Time Machine settings Follow the prompts to claim the existing backup Once the backup relationship is properly restored, macOS can automatically manage and reclaim snapshot space. Solution 2: Use Disk Analysis Tools to Identify Real Space Usage It is recommended to use tools that analyze disk usage without automatically deleting files, such as: GrandPerspective EtreCheck The goal is to identify: Which files or directories consume the most space Whether disk usage is abnormally concentrated in specific areas Avoid relying on “one-click cleanup” tools. Solution 3: Check for Residual Data from Old User Accounts If the device previously: Had multiple user accounts Removed accounts without deleting their home folders Then old home directories may still exist and be counted as System Data. Solution 4: Rebuild the System Environment Completely (Last Resort) When System Data usage becomes severely unmanageable and no clear source can be identified, the only definitive solution is: Fully back up all current data Erase the disk and reinstall macOS During setup: Migrate only the user account Do not migrate system settings, applications, or Library data This approach completely removes legacy data structure issues. VII. Long-Term Prevention Tips (for Keynote and Content Creators) Archive older Keynote projects to an external drive or NAS Avoid storing large volumes of presentation files locally for long periods Keep the Time Machine backup destination consistently available Avoid third-party tools that perform automated “system-level cleaning” Periodically monitor disk usage with analysis tools VIII. Conclusion Abnormally large macOS System Data usage is rarely caused by a single cache or log issue. Instead, it is typically the result of Time Machine local snapshots, application package resources, and inherited historical data structures working together. Only by understanding what System Data actually contains—and addressing the root causes—can disk space issues be resolved effectively and long-term.