All-In-One video library & player for iOS/macOS/tvOS
...
Best local and net disk movie/tv player on Mac, creating a local personal media library.
Price reduced to Free Trial!
  • $29.99
  • 0
Check your Mac's settings to make sure the mirror will work properly
  • Cristin
  • 2026-02-13 10:07:58


Check your Mac's settings to make sure the mirror will work properly

Q: My Mac is asking for access to Screen Recording. Should I allow that?

First, to ease your concerns, we don’t record your screen, and we don’t send any content to a server. We only temporarily store data in your device's memory before it is streamed to TV. Upon streaming, the content is removed from memory. So, it is safe to allow access to Screen Recording.

A: If you are using macOS 10.15 Catalina, you must allow Screen Recording in Privacy Settings. Read the step-by-step guide below.

The first time you click “Start Mirroring”, your Mac will show the following message:

Allow Screen Recording in Privacy Settings for Oka Mirror

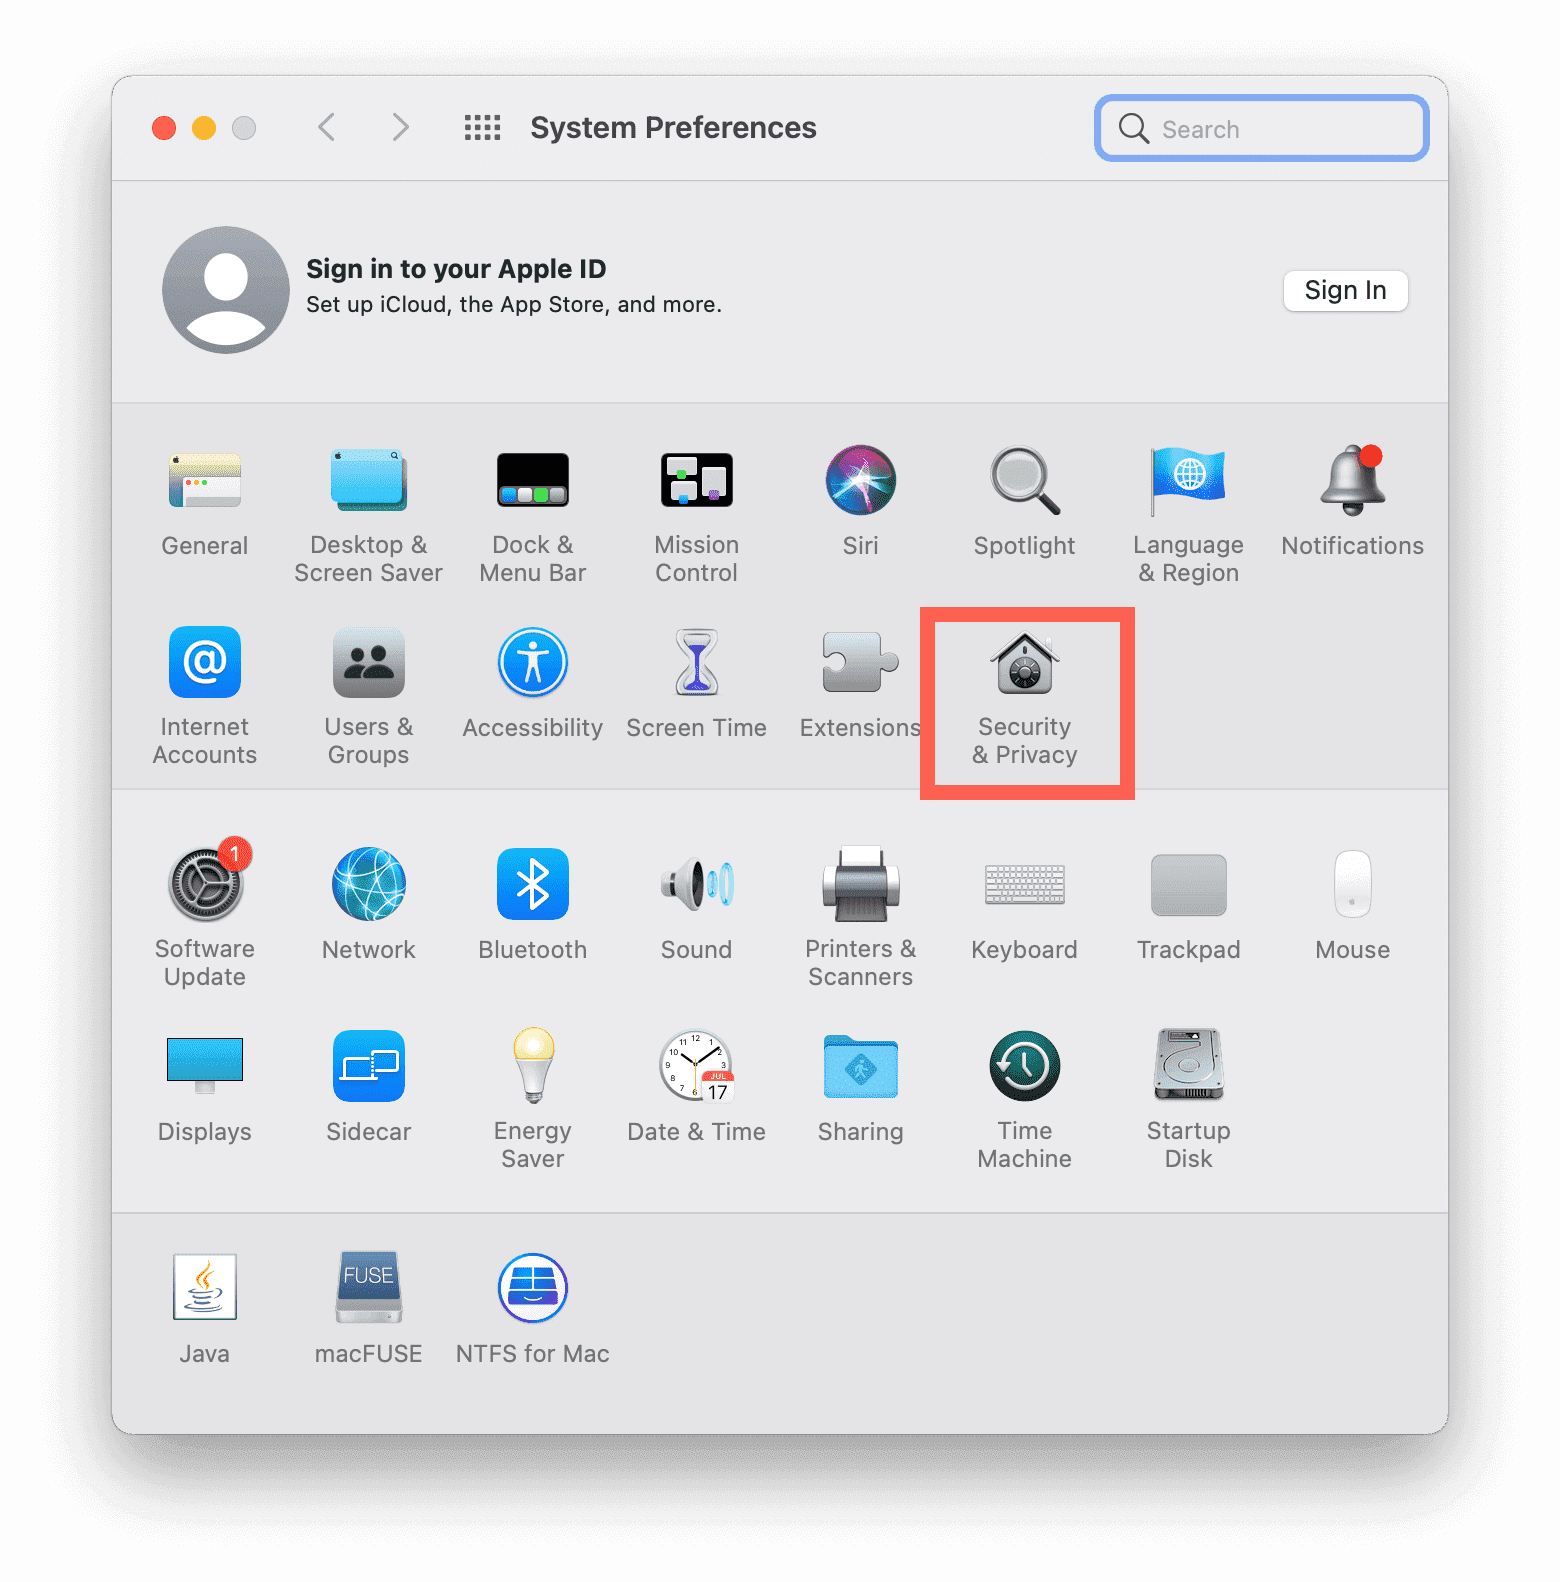
Please click “Open System Preferences” and go to “Security & Privacy” -> “Privacy” -> “Screen Recording”. That's it! You're done. Now, open the app again and enjoy mirroring!

Note: If you click “Deny” on the first step, you must quit the Oka Mirror app and re-launch it. Next, find the “Open Screen Recording Preferences” button on the main screen, click it, then follow the steps until finished.

Allow Screen Recording in Privacy Settings for Oka MirrorAllow Screen Recording in Privacy Settings for Oka Mirror

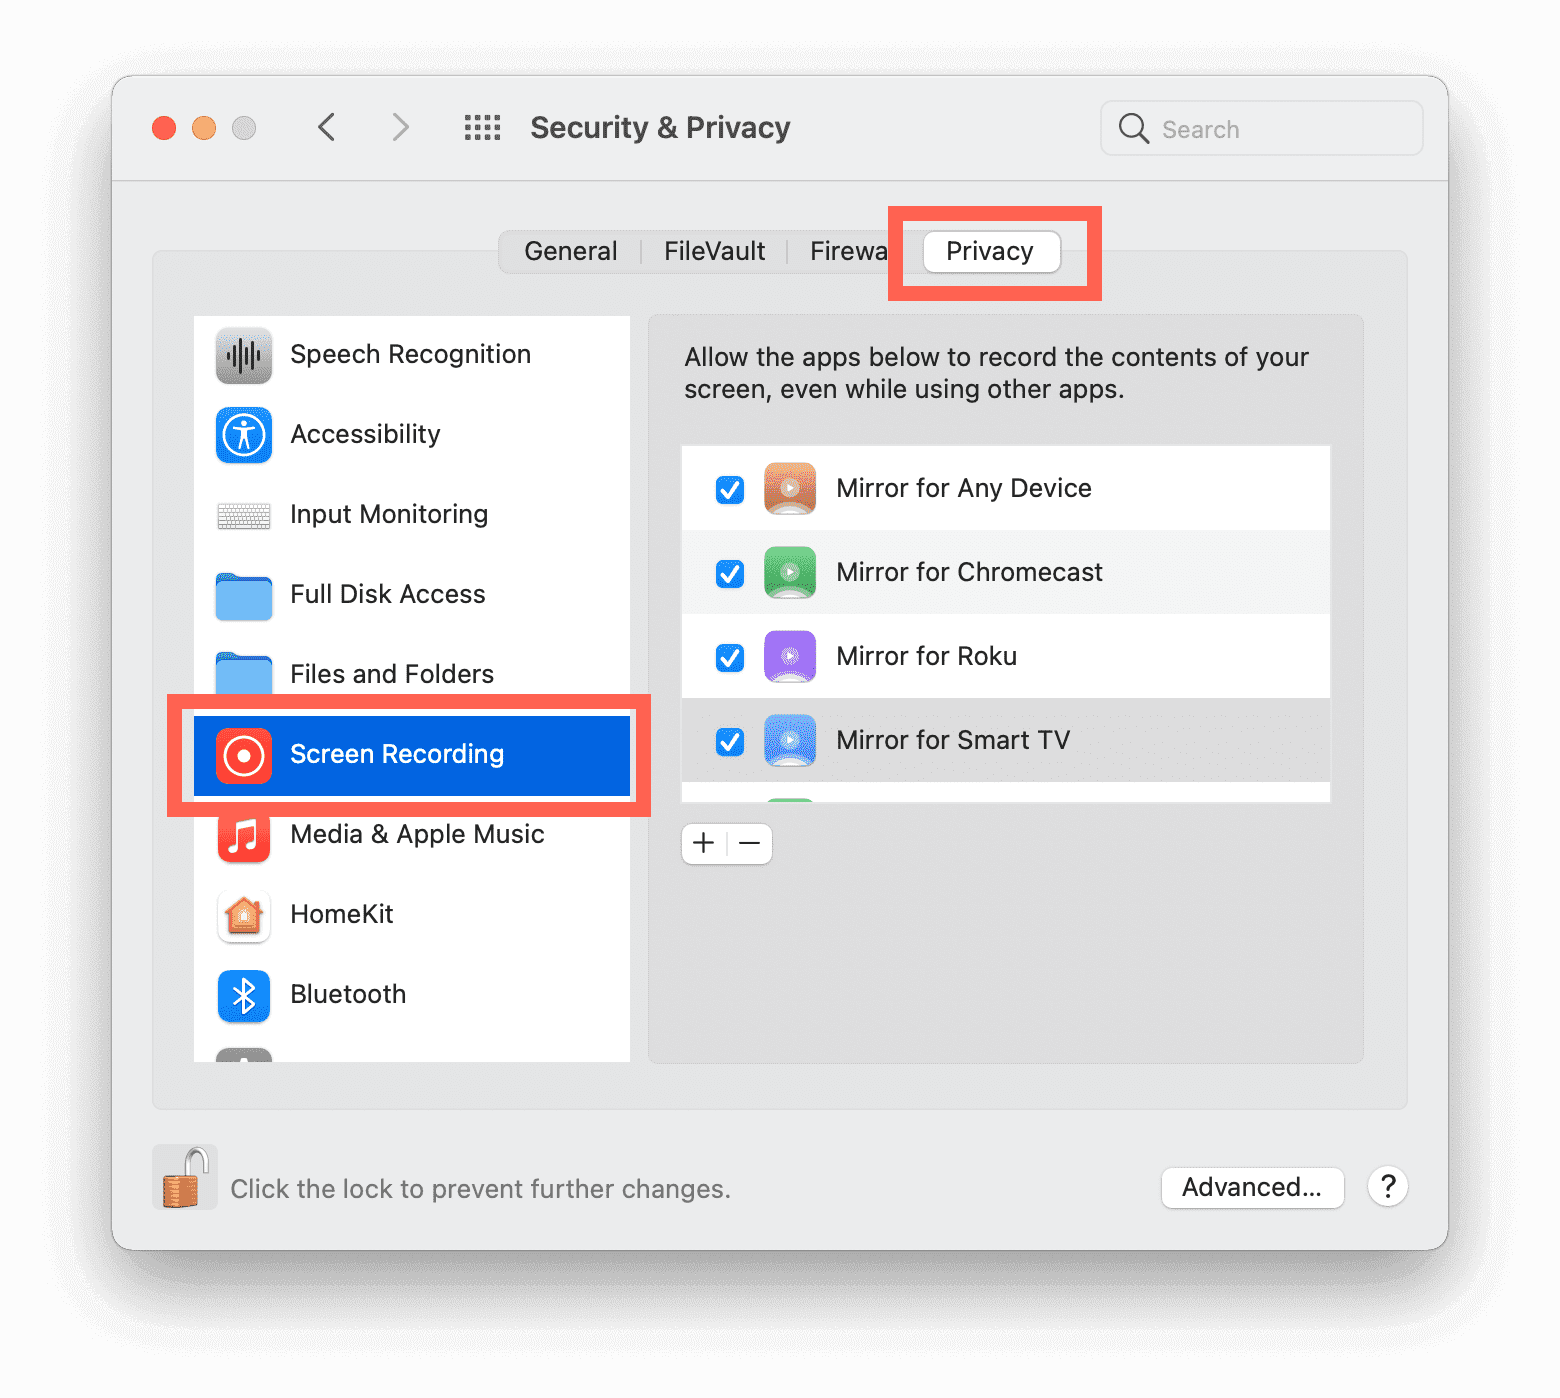
Click the checkmark next to the screen mirroring app you are using. When the screen mirroring app is opened, you will see this message; please select “Quit Now.”

Q: Why is there a 2 to 3-second delay when I mirror the screen?

This depends on your network performance. With current WiFi technology, there is no way to remove this lag.

Q: Why doesn't the app find the device I want to stream to?

A: Please make sure that your receiving device (e.g., Samsung TV, LG TV, Chromecast, Roku TV, etc.) and Mac are connected to the same Wi-Fi network. If you have problems discovering your device, here are some troubleshooting tips that may help:

Click the left bottom icon on the app view, then choose Quit App. Relaunch the app after you do all the steps below.

  1. Restart your router. First, unplug it from the power source, wait 30 seconds, then plug it back in.

  2. Restart your device. Unplug it from the power source for a complete reboot. Please disconnect it from its power source for at least one minute, then plug it back in. Powering off your TV is NOT ENOUGH to do a complete reboot.

  3. Make sure that your Mac and the receiving device are connected to the same WiFi network, the same router, and the same router channel. Some routers (dual band) have a 2.4GHz and a 5GHz wireless network. So it’s important not to have your Mac on the 5GHz network and the receiving device on the 2.4GHz network (or the other way around).

  4. Use an AC or N router. New routers support Wi-Fi AC&N, whereas old ones might only support WiFi B or G. WiFi B & G are not up to modern networking tasks, so please use an AC or N router.

  5. In many cases, the firewall on your computer may prevent the devices from communicating. Apple has provided instructions for allowing applications through the firewall. Consult the information here: http://support.apple.com/kb/ht1810

  6. You may have to follow a similar process with antivirus products, such as Norton. It’s essential as antivirus apps often have their firewalls and network traffic blockers. It’s easier to disable these apps while testing the connection fully, re-enable them and make adjustments later.

  7. The firewall on your router may prevent communication. Check that your router is configured correctly. Most home networks don’t need any particular configuration, but sometimes you may need to change a setting or two on your router to allow media streaming on your network.

  8. The device might not be detected if you use a VP. Please turn off VPN.

Q: My TV can be found but always fails on screen mirroring. What should I do?

If your system version is above MacOS 15.0, you should add the Oka mirror to the screen recording permission setting. See the first question on this page to find out how to do this.

Turn off the VPN if you are using one. Try to restart your Mac if it still doesn't work. In many cases, the firewall on your computer may prevent the devices from communicating. Apple has provided instructions for allowing applications through the firewall. Consult the information here: http://support.apple.com/kb/ht1810

Q: My TV can be found but always fails on casting media file. What should I do?

A: In most cases, this failure is because your TV does not support the file format natively. Check the “Auto Transcoding” option on the Streaming tab in Oka Mirror and restart the playback. Enabling this option allows Oka Mirror to transcode the file on the fly when streaming.

Q: The TV doesn’t have any sound during casting media files. What should I do?

A: In most cases, this failure is because your TV does not support the audio encoding of the media file. Check the “Auto Transcoding” option on the Streaming tab in Oka Mirror, then retry. Enabling this option allows Oka Mirror to transcode the file on the fly when streaming.

Q: My TV doesn’t have any sound during screen mirroring

A: For screen mirroring, you need to install the audio driver if you want to have sound. Get help from this blog.

Q: The sound of my TV is jumpy and stutters during screen mirroring. What should I do?

A: Mirroring the screen with sound consumes a lot of system resources. It will cause performance issues if your Mac model is too old. Please reduce the video quality and close other large apps when casting your screen with audio.

Q: Why can't I watch Netflix on my Mac and use screen mirroring simultaneously?

The error may be “Whoops, something went wrong…There appears to be a display problem. Please ensure your monitor is HDCP compliant and is not mirrored using Airplay.” This problem only exists on the Safari browser. When you use the Chrome or Firefox browser, the same content (in this case, “Designated Survivor” from Netflix) will play just fine. So, whenever you see this error message, please download and install Chrome or Firefox for Mac and use one of those two browsers to watch Netflix.

Q: Why can't some apps be cast or some DVDs or movies be cast?

Some apps block Screen Mirroring. This means application developers can choose if they want to block Screen Mirroring. For instance, Netflix, Disney+, and Apple TV have decided to block this.

Apple has HDCP DRM protection for playing DVDs or iTunes Movies. This means they also block screen mirroring when watching DVDs or iTunes Movies.

Q: How do I quit the Oka Mirror app?

Click the left icon of the app view, then choose Quit App.


Hottest Articles

Latest Articles

Mac System Data Exceeding 200GB? Here’s How to Actually Clear It — A Deep Dive with Heavy Keynote Usage and Time Machine as Examples I. Problem Overview After long-term use, some macOS users discover that “System Data” in Storage Settings grows abnormally large. Common symptoms include: System Data occupying 200GB or more https://cdn.okaapps.com/resource/图2.webp No corresponding files can be located in Finder Deleting caches or log files has little effect Third-party cleaning tools are ineffective Uninstalling and reinstalling apps (such as Keynote) does not help Even after reinstalling macOS, the issue reappears after some time This problem is especially common among heavy productivity users, such as those working extensively with Keynote, Final Cut Pro, or design tools. II. Commonly Tried but Ineffective Solutions Users typically attempt the following methods, most of which fail to solve the problem at its root: Manually deleting directories such as ~/Library/Caches and ~/Library/Logs Using third-party cleaning tools like CleanMyMac or similar utilities Uninstalling and reinstalling Keynote Reinstalling macOS via “Reinstall macOS” These approaches are limited because they do not address the real sources behind System Data inflation. III. What Exactly Is “System Data”? It is important to understand that: System Data is not a real folder, but rather a collection of data that macOS cannot accurately categorize. System Data may include, but is not limited to: macOS system temporary files Application and system caches Portions of the user Library (~/Library) Files Spotlight cannot classify Large resource files inside application packages Local caches from cloud services (such as iCloud or OneDrive) iPhone / iPad backup files Residual data from deleted user accounts Time Machine local snapshots As a result, System Data cannot be reliably inspected or reduced through simple cache deletion or Finder-based browsing. IV. Key Cause #1: Time Machine Local Snapshots Consuming Disk Space How Local Snapshots Work Even when no external drive or NAS is connected, macOS will: https://cdn.okaapps.com/resource/图3.webp Create a Time Machine local snapshot every hour Retain snapshots from the last 24 hours by default If the backup destination remains disconnected, keep local snapshots associated with the most recent full backup These snapshots: Are based on the APFS file system Do not appear as regular files Are entirely counted under System Data In some cases, local snapshots can consume tens or even hundreds of gigabytes. https://cdn.okaapps.com/resource/图4.webp Why They Sometimes Cannot Be Deleted When Time Machine uses a NAS or network storage device as its backup destination, the following situations may occur: The NAS was previously disconnected The network path or IP address changed The backup was not re-“claimed” by the system As a result, macOS may treat these snapshots as belonging to an unreachable backup destination, leading to: tmutil deletion failures Errors such as Stale NFS file handle Snapshots that cannot be reclaimed, causing persistent disk usage V. Key Cause #2: How Keynote and Similar Apps Amplify System Data Keynote itself is not malfunctioning, but its design inherently amplifies System Data usage: Keynote files are actually packages containing large numbers of resources These may include: High-resolution images Embedded videos Fonts Animation and transition assets Spotlight sometimes fails to correctly classify these resources, causing them to be grouped under System Data. For users who frequently create large, media-heavy presentations, steady growth in System Data over time is expected. VI. Effective Solutions (Prioritized) Solution 1: Verify and Restore Time Machine Backup Status (Recommended) Open Disk Utility From the menu bar, select Show APFS Snapshots Select the system Data volume Check whether a large number of Time Machine local snapshots exist If using a NAS as the backup destination: Reconnect the NAS Select the original backup in Time Machine settings Follow the prompts to claim the existing backup Once the backup relationship is properly restored, macOS can automatically manage and reclaim snapshot space. Solution 2: Use Disk Analysis Tools to Identify Real Space Usage It is recommended to use tools that analyze disk usage without automatically deleting files, such as: GrandPerspective EtreCheck The goal is to identify: Which files or directories consume the most space Whether disk usage is abnormally concentrated in specific areas Avoid relying on “one-click cleanup” tools. Solution 3: Check for Residual Data from Old User Accounts If the device previously: Had multiple user accounts Removed accounts without deleting their home folders Then old home directories may still exist and be counted as System Data. Solution 4: Rebuild the System Environment Completely (Last Resort) When System Data usage becomes severely unmanageable and no clear source can be identified, the only definitive solution is: Fully back up all current data Erase the disk and reinstall macOS During setup: Migrate only the user account Do not migrate system settings, applications, or Library data This approach completely removes legacy data structure issues. VII. Long-Term Prevention Tips (for Keynote and Content Creators) Archive older Keynote projects to an external drive or NAS Avoid storing large volumes of presentation files locally for long periods Keep the Time Machine backup destination consistently available Avoid third-party tools that perform automated “system-level cleaning” Periodically monitor disk usage with analysis tools VIII. Conclusion Abnormally large macOS System Data usage is rarely caused by a single cache or log issue. Instead, it is typically the result of Time Machine local snapshots, application package resources, and inherited historical data structures working together. Only by understanding what System Data actually contains—and addressing the root causes—can disk space issues be resolved effectively and long-term.